
Java消息系统简单设计与实现
前言:因为导师在我的毕设项目里加了消息系统(原本想水水就过的..),没办法…来略微研究研究吧..简单简单…
需求分析
我的毕设是一个博客系统,相似于简书这样的,所以消息系统也相似,在客户的消息里包含了有:喜欢和赞、评论、关注、私信这样的一类东西,这样的一个系统应该包含以下的功能:
- 当客户评论/关注/点赞时能够通知到被评论/关注/点赞的客户,并生成像如下格式的提醒信息(允许取消关注/点赞但不收到通知):
我没有 关注了 你
三颗 喜欢了你的文章 《Java消息系统简单设计与实现》
心脏 评论了你的文章 《Java消息系统简单设计与实现》- 客户之间能够发送/接受私信,不需要像QQ那样建立长连接实现实时通信,但刷新列表能看到新消息,并且界面相似QQ聊天界面一左一右,允许删除私信;
- 管理员能发送通告,其实就像是用管理员的账号给每一个客户发送私信;
- 可以查看关注的客户最新发表的文章,得到相似推送的效果;
- 所有消息当然也要标注好消息已读or未读,登录就能得到消息提示标识好有多少未读消息,像是QQ消息右上角的小红点那样相似;
OK,大致就是以上的功能,那么问题来了:这要怎样设计啊?

进一步分析
其实可以根据上面的需求分析,把上面的消息大致可以分为声明(Announcement)、提示(Remind)、私信(Message)三类,我们可以大致笼统出一个 通知(Notify) 模型:
| 发送者 | 接受者 | 信息类型 | 动作类型 | 通知内容 | 能否已读 | 消息创立时间 |
|---|---|---|---|---|---|---|
| 粉丝1号 | 我没有三颗心脏 | 提示 | 关注 | 粉丝1号 关注了 你 | 是 | xx:xx:xx |
| 粉丝1号 | 我没有三颗心脏 | 提示 | 喜欢和赞 | 粉丝1号 喜欢了你的文章 《Java消息系统简单设计与实现》 | 是 | xx:xx:xx |
| 粉丝1号 | 我没有三颗心脏 | 提示 | 评论 | 粉丝1号 评论了你的文章 《Java消息系统简单设计与实现》 | 是 | xx:xx:xx |
| 粉丝2号 | 我没有三颗心脏 | 私信 | 无 | 你收到了来自 粉丝2号 的 1 条私信 | 是 | xx:xx:xx |
上面加了少量数据以便了解,不过话说粉丝1号果然是真爱粉,又关注又喜欢又评论,嘻嘻嘻嘻…
emm.这样的模型能够胜任我们的工作吗?我也不知道..不过根据这个模型能够想出大概的这样的创立通知的逻辑:
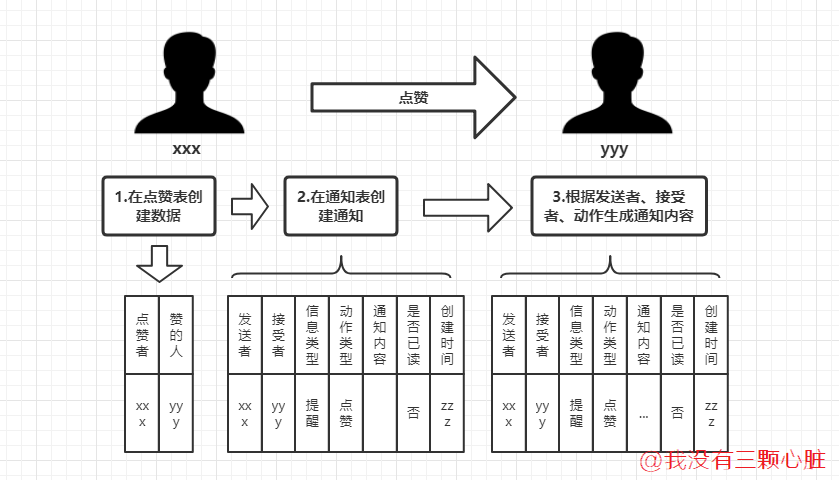
似乎看上去也没有什么大问题..不过既然消息内容都可以根据动作类型自动生成的了,加上私信和声明的内容由于长度问题也一定不保存在这张表里的好,所以我们在设计数据库时干脆把通知内容这条去掉不要,当信息类型是声明或者者私信时可以根据这条通知的 id 在相应的表中找到相应的数据即可以了,emm..我觉得可以
顺下去想想其实脑中有了一个大概,这样的模型还容易设计和想到,其实主要的问题还是下面的那些
问题一:单表数据大了怎样办?
假如当客户量上去到肯定量的时候,那么这张 通知表 势必会变得巨大,由于不论是我们的声明、提示还是私信都会在这个通知表上创立一条数据,到时候就会面临查询慢的问题,问题的答案是:我也不知道..
所以我们的规定是:不考虑像简书这样超大客户量,能够应付毕设就好啦..简单设计,嘻嘻嘻..不过也不要太不相信MySQL的性能,还是有肯定容纳能力的!
问题二:客户要怎么正确得到自己的未读消息呢?
暴力一点方法是,反正通知表里有客户所有的消息,直接读取完,而后通过能否已读字段就能够找到正确的所有未读消息了,这..这么简单吗?
其实有思考过使用时间或者者另建一张保存有最新已读到哪条消息的表,但客户可以选择有少量读有少量不读,这两个似乎都很难达到目的…还是暴力吧
问题三:私信消息该怎样设计?
| 发送者 | 接受者 | 内容 | 发送时间 |
|---|---|---|---|
| 粉丝1号 | 我没有三颗心脏 | 我是你的真爱粉啊!我要给你生猴子! | 2019年1月7日11:34:23 |
| 我没有三颗心脏 | 粉丝1号 | 已阅…下一个… | 2019年1月7日11:34:53 |
就像 QQ消息 一样嘛,包含一个内容、时间、发送者和接受者,而后前台直接根据时间或者者 id 排序生成一左一右的消息对话框,不过比较特殊的一点就是私信是一个双向交流的过程,在一个对话框中我可能既是接受者也是发送者,这也无所谓嘛,略微分析分析场景:
- 读取私信列表时:按照接受者和发送者一起查询的准则,也就是查询接受者是自己和发送者是自己的数据,而后根据时间和已读未读来建立私信列表;
- 读取私信时:这时已经有了明确的接受者和发送者,那就查询所有 发送者是对方接受者是自己 Or 发送者是自己接受者是对方 的数据,而后在前台拼凑出一左一右的聊天框;
- 发送私信时:先查询之前能否有记录,而后同上建立聊天框,点击发送之后把发送方设为自己接收方设为私信对象,而后在通知表中新建一条未读数据通知私信对象有私信来了;
这完全能满足要求,只不过感觉查询多了些..
数据库设计
简单弄了弄弄..看着挺难受的,不过能简单实现功能,并且为了演示,这里是做了一张user_follow表,表示客户之间的关联关系,点赞和评论与这个相似,就不多弄了..下面给一下建表语句吧:
user表:
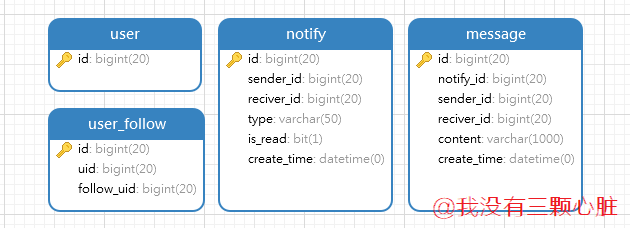
CREATE TABLE `user` ( `id` bigint(20) NOT NULL AUTO_INCREMENT COMMENT '主键', `username` varchar(50) NOT NULL COMMENT '客户姓名', PRIMARY KEY (`id`)) ENGINE=InnoDB AUTO_INCREMENT=5 DEFAULT CHARSET=utf8;user_follow表:
CREATE TABLE `user_follow` ( `id` bigint(20) NOT NULL AUTO_INCREMENT COMMENT '主键', `uid` bigint(20) NOT NULL COMMENT '客户ID', `follow_uid` bigint(20) NOT NULL COMMENT '关注的客户id', PRIMARY KEY (`id`)) ENGINE=InnoDB DEFAULT CHARSET=utf8 COMMENT='客户关注表,记录了所有客户的关注信息';notify表:
CREATE TABLE `notify` ( `id` bigint(20) NOT NULL AUTO_INCREMENT COMMENT '主键', `sender_id` bigint(20) NOT NULL COMMENT '发送者客户ID', `reciver_id` bigint(20) NOT NULL COMMENT '接受者客户ID', `type` varchar(50) NOT NULL COMMENT '消息类型:announcement声明/remind提示/message私信', `is_read` bit(1) NOT NULL DEFAULT b'0' COMMENT '能否已读,0未读,1已读', `create_time` datetime NOT NULL DEFAULT CURRENT_TIMESTAMP COMMENT '创立时间:按当前时间自动创立', PRIMARY KEY (`id`)) ENGINE=InnoDB DEFAULT CHARSET=utf8 COMMENT='客户通知表,包含了所有客户的消息';message表:
CREATE TABLE `message` ( `id` bigint(20) NOT NULL AUTO_INCREMENT COMMENT '主键', `notify_id` bigint(20) NOT NULL COMMENT '对应通知消息的id', `sender_id` bigint(20) NOT NULL COMMENT '发送者客户ID', `reciver_id` bigint(20) NOT NULL COMMENT '接受者客户ID', `content` varchar(1000) NOT NULL COMMENT '消息内容,最长长度不允许超过1000', `create_time` datetime NOT NULL DEFAULT CURRENT_TIMESTAMP COMMENT '创立时间:按当前时间自动创立', PRIMARY KEY (`id`)) ENGINE=InnoDB DEFAULT CHARSET=utf8 COMMENT='私信信息表,包含了所有客户的私信信息';根据《Java开发手册》5.3 第六条 没有使用任何级联和外键,bingo!
Spring Boot + MyBatis 实例
第一步:基础环境调试
SpringBoot项目怎样搭就不说了吧,给一给几个关键的配置文件:
pom包依赖:
<dependency> <groupId>org.springframework.boot</groupId> <artifactId>spring-boot-starter-web</artifactId></dependency><dependency> <groupId>org.mybatis.spring.boot</groupId> <artifactId>mybatis-spring-boot-starter</artifactId> <version>1.3.2</version></dependency><!-- SpringBoot - MyBatis 逆向工程 --><dependency> <groupId>org.mybatis.generator</groupId> <artifactId>mybatis-generator-core</artifactId> <version>1.3.6</version></dependency><dependency> <groupId>mysql</groupId> <artifactId>mysql-connector-java</artifactId> <scope>5.1.18</scope></dependency><dependency> <groupId>org.springframework.boot</groupId> <artifactId>spring-boot-starter-test</artifactId> <scope>test</scope></dependency>这里有一个巨坑,耗费了我好半天的时间,不知道为什么我明明引入的 5.1.18 版本的 mysql-connector-java,可 Maven 就是非要给我比较新版本的 8.0.13,这导致了在我使用 MyBatis 逆向工程生成 domain 和 mapper 的过程中出现了以下的问题:
- 1、提醒我数据库连接的驱动名称需要改成
com.mysql.cj.jdbc.Driver而不是之前的com.mysql.jdbc.Driver,不然就报错:
Loading class
com.mysql.jdbc.Driver'. This is deprecated. The new driver class iscom.mysql.cj.jdbc.Driver’. The driver is automatically registered via the SPI and manual loading of the driver class is generally unnecessary.
- 2、还需要设置 mysql 的时区,也就是需要将
connectionURL属性写成"jdbc:mysql://localhost:3306/test?serverTimezone=UTC"。假如不指定serverTimezone=UTC(还必需大写),将报错:
java.sql.SQLException: The server time zone value ‘?й???????’ is unrecognized or represents more than one time zone. You must configure either the server or JDBC driver (via the serverTimezone configuration property) to use a more specifc time zone value if you want to utilize time zone support.
??at com.mysql.cj.jdbc.exceptions.SQLError.createSQLException(SQLError.java:695)
??at com.mysql.cj.jdbc.exceptions.SQLError.createSQLException(SQLError.java:663)
- 3、逆向工程会去找 MySQL 其余库的相同表名的表,而后生成一堆乱七八糟的东西,还因为找不到主键 id 生成了只含
inser()方法而不含删除、升级方法的 Mapper 文件;
处理方法就只有自己手动去调低 mysql-connector-java 的版本到 5.xx,还找到一个跟我情况相似:https://blog.csdn.net/angel_xiaa/article/details/52474022
application.properties:
## 数据库连接配置spring.datasource.driver-class-name=com.mysql.jdbc.Driverspring.datasource.url=jdbc:mysql://127.0.0.1:3306/message_system?characterEncoding=UTF-8spring.datasource.username=rootspring.datasource.password=123456## MyBatis相关配置mybatis.type-aliases-package=com.wmyskxz.demo.messagesystem.domainmybatis.mapper-locations=classpath:mapper/*.xml在启动类上加上注解:
@EnableTransactionManagement // 启注解事务管理,等同于xml配置方式的 <tx:annotation-driven />@MapperScan("com.wmyskxz.demo.messagesystem.dao")@SpringBootApplicationpublic class MessageSystemApplication { ....}第二步:MyBatis 逆向工程
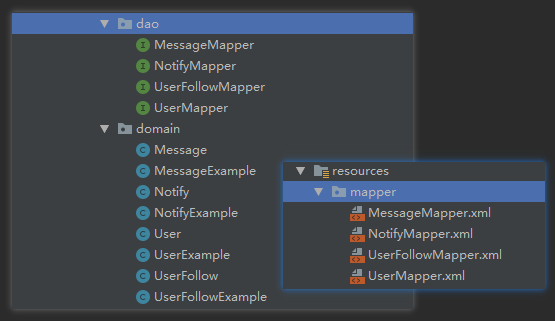
新建【util】包,在下面新建两个类:
MybatisGenerator类:
public class MybatisGenerator { public static void main(String[] args) throws Exception { String today = "2019-1-7"; SimpleDateFormat sdf = new SimpleDateFormat("yyyy-MM-dd"); Date now = sdf.parse(today); Date d = new Date(); if (d.getTime() > now.getTime() + 1000 * 60 * 60 * 24) { System.err.println("——————未成成功运行——————"); System.err.println("——————未成成功运行——————"); System.err.println("本程序具备破坏作用,应该只运行一次,假如必需要再运行,需要修改today变量为今天,如:" + sdf.format(new Date())); return; } if (false) return; List<String> warnings = new ArrayList<String>(); boolean overwrite = true; InputStream is = MybatisGenerator.class.getClassLoader().getResource("generatorConfig.xml").openStream(); ConfigurationParser cp = new ConfigurationParser(warnings); Configuration config = cp.parseConfiguration(is); is.close(); DefaultShellCallback callback = new DefaultShellCallback(overwrite); MyBatisGenerator myBatisGenerator = new MyBatisGenerator(config, callback, warnings); myBatisGenerator.generate(null); System.out.println("生成代码成功,只能执行一次,以后执行会覆盖掉mapper,pojo,xml 等文件上做的修改"); }}OverIsMergeablePlugin类:
/** * 解決 MyBatis 逆向工程重复生成覆盖问题的工具类 */public class OverIsMergeablePlugin extends PluginAdapter { @Override public boolean validate(List<String> warnings) { return true; } @Override public boolean sqlMapGenerated(GeneratedXmlFile sqlMap, IntrospectedTable introspectedTable) { try { Field field = sqlMap.getClass().getDeclaredField("isMergeable"); field.setAccessible(true); field.setBoolean(sqlMap, false); } catch (Exception e) { e.printStackTrace(); } return true; }}在【resrouces】资源文件下新建逆向工程配置文件【generatorConfig.xml】:
<?xml version="1.0" encoding="UTF-8"?><!DOCTYPE generatorConfiguration PUBLIC "-//mybatis.org//DTD MyBatis Generator Configuration 1.0//EN" "http://mybatis.org/dtd/mybatis-generator-config_1_0.dtd"><generatorConfiguration> <context id="DB2Tables" targetRuntime="MyBatis3"> <!--避免生成重复代码的插件--> <plugin type="com.wmyskxz.demo.messagesystem.util.OverIsMergeablePlugin"/> <!-- 能否去除自动生成的代码中的注释 true:是 false:否--> <commentGenerator> <property name="suppressDate" value="true"/> <property name="suppressAllComments" value="true"/> </commentGenerator> <!--数据库链接地址账号密码--> <jdbcConnection driverClass="com.mysql.jdbc.Driver" connectionURL="jdbc:mysql://localhost:3306/message_system?serverTimezone=UTC" userId="root" password="123456"> </jdbcConnection> <!-- 默认 false,把 JDBC DECIMAL 和 NUMERIC 类型解析为 Integer 为 true 时解析为 java.math.BigDecimal --> <javaTypeResolver> <property name="forceBigDecimals" value="false"/> </javaTypeResolver> <!--生成pojo类存放位置--> <javaModelGenerator targetPackage="com.wmyskxz.demo.messagesystem.domain" targetProject="src/main/java"> <!-- enableSubPackages:能否让 schema 作为包的后缀--> <property name="enableSubPackages" value="true"/> <!-- trimStrings:从数据库返回的值被清除前后的空格 --> <property name="trimStrings" value="true"/> <!-- 能否对model增加 构造函数 --> <property name="constructorBased" value="true"/> </javaModelGenerator> <!--生成xml映射文件存放位置--> <sqlMapGenerator targetPackage="mapper" targetProject="src/main/resources"> <property name="enableSubPackages" value="true"/> </sqlMapGenerator> <!--生成mapper类存放位置--> <javaClientGenerator type="XMLMAPPER" targetPackage="com.wmyskxz.demo.messagesystem.dao" targetProject="src/main/java"> <property name="enableSubPackages" value="true"/> </javaClientGenerator> <!--生成对应表及类名 tableName:要生成的表名 domainObjectName:生成后的实例名 enableCountByExample:Count语句中加入where条件查询,默认为true开启 enableUpdateByExample:Update语句中加入where条件查询,默认为true开启 enableDeleteByExample:Delete语句中加入where条件查询,默认为true开启 enableSelectByExample:Select多条语句中加入where条件查询,默认为true开启 selectByExampleQueryId:Select单个对象语句中加入where条件查询,默认为true开启 --> <table tableName="user" domainObjectName="User" enableCountByExample="false" enableUpdateByExample="false" enableDeleteByExample="false" enableSelectByExample="true" selectByExampleQueryId="false" enableDeleteByPrimaryKey="true" enableUpdateByPrimaryKey="true"> <property name="my.isgen.usekeys" value="true"/> <property name="useActualColumnNames" value="false"/> <generatedKey column="id" sqlStatement="JDBC"/> </table> <table tableName="notify" domainObjectName="Notify" enableCountByExample="false" enableUpdateByExample="false" enableDeleteByExample="false" enableSelectByExample="true" selectByExampleQueryId="false" enableDeleteByPrimaryKey="true" enableUpdateByPrimaryKey="true"> <property name="my.isgen.usekeys" value="true"/> <property name="useActualColumnNames" value="false"/> <generatedKey column="id" sqlStatement="JDBC"/> </table> <table tableName="user_follow" domainObjectName="UserFollow" enableCountByExample="false" enableUpdateByExample="false" enableDeleteByExample="false" enableSelectByExample="true" selectByExampleQueryId="false" enableDeleteByPrimaryKey="true" enableUpdateByPrimaryKey="true"> <property name="my.isgen.usekeys" value="true"/> <property name="useActualColumnNames" value="false"/> <generatedKey column="id" sqlStatement="JDBC"/> </table> <table tableName="message" domainObjectName="Message" enableCountByExample="false" enableUpdateByExample="false" enableDeleteByExample="false" enableSelectByExample="true" selectByExampleQueryId="false" enableDeleteByPrimaryKey="true" enableUpdateByPrimaryKey="true"> <property name="my.isgen.usekeys" value="true"/> <property name="useActualColumnNames" value="false"/> <generatedKey column="id" sqlStatement="JDBC"/> </table> </context></generatorConfiguration>运行我们的【MybatisGenerator】类中的 main 方法就能看到自动生成的实体、Xml文件以及 Mapper 类
第三步:Service 层
不给接口了,直接给实现吧,方法都很简单,而且没有做任何的安全限制,只是为了实现简单的消息系统,看效果
UserServiceImpl:
@Servicepublic class UserServiceImpl implements UserService { @Resource UserMapper userMapper; @Override public void addUserByUsername(String username) { userMapper.insert(new User(null, username));// 主键自增长. } @Override public User findUserById(Long id) { return userMapper.selectByPrimaryKey(id); }}UserFollowServiceImpl:
@Servicepublic class UserFollowServiceImpl implements UserFollowService { @Resource UserFollowMapper userFollowMapper; @Autowired NotifyService notifyService; @Override public void userAFollowUserBById(Long userAId, Long userBId) { // 先要创立一条提醒消息 notifyService.addNotify(userAId, userBId, "follow");// 关注信息 UserFollow userFollow = new UserFollow(); userFollow.setUid(userAId); userFollow.setFollowUid(userBId); userFollowMapper.insertSelective(userFollow); } @Override public void userAUnfollowUserBById(Long userAId, Long userBId) { // 首先查询到相关的记录 UserFollowExample example = new UserFollowExample(); example.or().andUidEqualTo(userAId).andFollowUidEqualTo(userBId); UserFollow userFollow = userFollowMapper.selectByExample(example).get(0); // 删除关注数据 userFollowMapper.deleteByPrimaryKey(userFollow.getId()); }}NotifyServiceImpl:
@Servicepublic class NotifyServiceImpl implements NotifyService { @Resource NotifyMapper notifyMapper; @Override public int addNotify(Long senderId, Long reciverId, String type) { Notify notify = new Notify(null, senderId, reciverId, type, false, null); return notifyMapper.insertSelective(notify);// id和creatTime自动生成. } @Override public void readNotifyById(Long id) { Notify notify = notifyMapper.selectByPrimaryKey(id); notify.setIsRead(true); notifyMapper.updateByPrimaryKey(notify); } @Override public List<Notify> findAllNotifyByReciverId(Long id) { List<Notify> notifies = new LinkedList<>(); NotifyExample example = new NotifyExample(); example.setOrderByClause("`id` DESC");// 按id倒叙,也就是第一个数据是最新的. example.or().andReciverIdEqualTo(id); notifies.addAll(notifyMapper.selectByExample(example)); return notifies; } @Override public List<Notify> findAllUnReadNotifyByReciverId(Long id) { List<Notify> notifies = new LinkedList<>(); NotifyExample example = new NotifyExample(); example.setOrderByClause("`id` DESC");// 按id倒叙,也就是第一个数据是最新的. example.or().andReciverIdEqualTo(id).andIsReadEqualTo(false); notifies.addAll(notifyMapper.selectByExample(example)); return notifies; }}MessageServiceImpl:
@Servicepublic class MessageServiceImpl implements MessageService { @Resource MessageMapper messageMapper; @Resource NotifyService notifyService; @Override public void addMessage(Long senderId, Long reciverId, String content) { // 先创立一条 notify 数据 Long notifyId = (long) notifyService.addNotify(senderId, reciverId, "message");// message表示私信 // 添加一条私信信心 Message message = new Message(null, notifyId, senderId, reciverId, content, null); messageMapper.insertSelective(message);// 插入非空项,id/createTime数据库自动生成 } @Override public void deleteMessageById(Long id) { messageMapper.deleteByPrimaryKey(id); } @Override public Message findMessageByNotifyId(Long id) { // 触发方法时应把消息置为已读 notifyService.readNotifyById(id); MessageExample example = new MessageExample(); example.or().andNotifyIdEqualTo(id); return messageMapper.selectByExample(example).get(0); }}第四步:Controller 层
也很简单,只是为了看效果
UserController:
@RestControllerpublic class UserController { @Autowired UserService userService; @PostMapping("/addUser") public String addUser(@RequestParam String username) { userService.addUserByUsername(username); return "Success!"; } @GetMapping("/findUser") public User findUser(@RequestParam Long id) { return userService.findUserById(id); }}UserFollowController :
@RestControllerpublic class UserFollowController { @Autowired UserFollowService userFollowService; @PostMapping("/follow") public String follow(@RequestParam Long userAId, @RequestParam Long userBId) { userFollowService.userAFollowUserBById(userAId, userBId); return "Success!"; } @PostMapping("/unfollow") public String unfollow(@RequestParam Long userAId, @RequestParam Long userBId) { userFollowService.userAUnfollowUserBById(userAId, userBId); return "Success!"; }}NotifyController :
@RestControllerpublic class NotifyController { @Autowired NotifyService notifyService; @PostMapping("/addNotify") public String addNotify(@RequestParam Long senderId, @RequestParam Long reciverId, @RequestParam String type) { notifyService.addNotify(senderId, reciverId, type); return "Success!"; } @PostMapping("/readNotify") public String readNotify(@RequestParam Long id) { notifyService.readNotifyById(id); return "Success!"; } @GetMapping("/listAllNotify") public List<Notify> listAllNotify(@RequestParam Long id) { return notifyService.findAllNotifyByReciverId(id); } @GetMapping("/listAllUnReadNotify") public List<Notify> listAllUnReadNotify(@RequestParam Long id) { return notifyService.findAllUnReadNotifyByReciverId(id); }}MessageController :
@RestControllerpublic class MessageController { @Autowired MessageService messageService; @PostMapping("/addMessage") public String addMessage(@RequestParam Long senderId, @RequestParam Long reciverId, @RequestParam String content) { messageService.addMessage(senderId, reciverId, content); return "Success!"; } @DeleteMapping("/deleteMessage") public String deleteMessage(@RequestParam Long id) { messageService.deleteMessageById(id); return "Success!"; } @GetMapping("/findMessage") public Message findMessage(@RequestParam Long id) { return messageService.findMessageByNotifyId(id); }}第五步:测试
通过 REST 测试工具,可以看到正确的效果,这里就不给出所有的测试了。
总结
以上的项目简单而且没有任何的安全验证,不过能够基本完成我们的需求,还有少量功能没有实现,例如管理员发通告(上面只演示了私信和关注信息),按照上面的系统就直接暴力给每个客户都加一条通知消息,感觉有点自闭..我也不知道怎样设计好..希望有经验的大大能指条路啊!
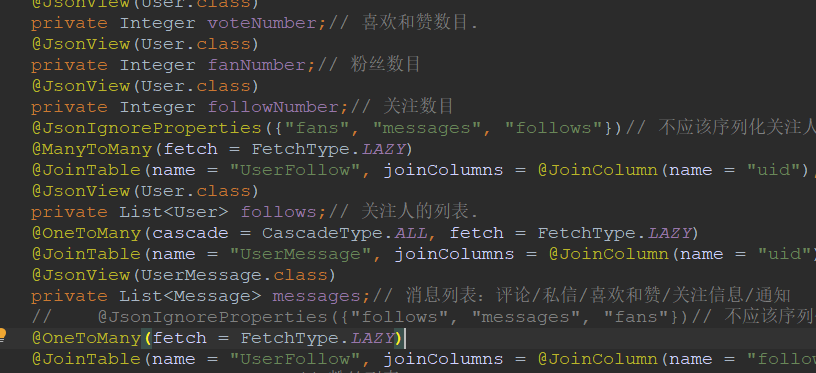
其实关于这个简单的系统我查了好多好多资料..把自己都看自闭了,后来我干脆把所有网页都关掉,开始用 JPA 自己开始笼统实体,把各个实体写出来并把所有实体需要的数据啊相互之间的关联关系啊写清楚,而后再从自动生成的数据库中找思路…hhh…要不是我 JPA 不是很熟我觉得用 JPA 就能写出来了,不用 JPA 的起因在于少量数据的懒加载不知道怎样解决,还有就是查询语句太复杂,免不了要白费少量资源…emmm..说究竟还是不是特别懂 JPA,下面给一张复杂的用 JPA 建立的 User 实体吧(随手截的..hhh…很乱..):
按照惯例黏一个尾巴:
欢迎转载,转载请注明出处!
简书ID:@我没有三颗心脏
github:wmyskxz
欢迎关注公众微信号:wmyskxz
分享自己的学习 & 学习资料 & 生活
想要交流的朋友也可以加qq群:3382693
1. 本站所有资源来源于用户上传和网络,如有侵权请邮件联系站长!
2. 分享目的仅供大家学习和交流,您必须在下载后24小时内删除!
3. 不得使用于非法商业用途,不得违反国家法律。否则后果自负!
4. 本站提供的源码、模板、插件等等其他资源,都不包含技术服务请大家谅解!
5. 如有链接无法下载、失效或广告,请联系管理员处理!
6. 本站资源售价只是摆设,本站源码仅提供给会员学习使用!
7. 如遇到加密压缩包,请使用360解压,如遇到无法解压的请联系管理员
开心源码网 » Java消息系统简单设计与实现


